
On one of my recent blog-tip features: 10 Tips On Growing Your Blog Audience, quite a few readers expressed a keen interest to learn more about the benefits of optimizing images to boost blog traffic, and not being one to disappoint that’s exactly what we’re focusing on in today’s post! So go grab your notepads as this could be rather useful ladies 😉
Now although I’m by nooooo means a techie; during my own blog journey I’ve learnt a few valuable lessons that have really helped me grow Confetti & Curves. Getting to grips with properly optimizing my images has been a lesson that has certainly yielded pretty successful results to date. So for those who may be newbies at blogging, who aren’t the most fluent in computer lingo or self acclaimed SEO wizards – but are curious on how to reap the benefits from your blog images, then this just might be right up your street…
.

Although search engines perform like highly intelligant well-oiled machines, they can’t recognise an image visually like you and I can, therefore they need words in place of pretty pixels to uncover what’s been searched for. So when a cosmetic craver takes to an online oracle (such as Google) and types a series of words into the search bar e.g ‘Maybelline Colour Show Nail Polish in Pink Party Dress’, the search engine will filter out exactly what ‘key words & tags’ it has successfully picked up on with those words or phrases attached to the images that have been optimized.
Therefore, as a blogger with a keen interest on driving more traffic to your online haven, the more detailed YOU are when it comes to entering a description to your images the more likely a search engine is to pick it up = voila, your image is found by the user who clicks on the source to redirect straight to your blog. Mission accomplished!
.

Thankfully WordPress have made it super easy-peasy for us mere mortals who haven’t the first clue about coding or any of that important guff. When uploading a picture from your computer hard drive, you’ll notice a nifty little ‘Attachment Details’ box to the right hand side of the media library as shown below…

As you can see there’s a number of fields in which you can enter text. Confused what goes where? Here’s a quick run through…
URL: This is where the image is stored on your WordPress Site.
Title: This is simply as it suggests, the title of your image. If uploading from a camera you may notice a series of letters/numbers. Be sure to replace with an actual description eg. change DSC00001 to something more descriptive such as ‘Red Chanel Lipstick shade 444 Gabrielle’.
Caption: This is where you can add text to show beneath your image e.g ‘My Favourite Red Lipstick’.
Alt Text: This is text that search engines will more than likely pick up on & will also show if the image is slow in uploading. This is where you need to enter your key words/description e.g ‘Red Lipstick, Chanel 444 Gabrielle’.
Attachment Display Settings…
Alignment: Allows you to choose the format in which you want your image to be positioned.
Link To: This controls where a reader is taken to when they click on your image. Media File opens the file in it’s own tab. Attachment Page opens the image on its own page in your site. Custom URL allows you to set a specific page where you’d like your reader to be redirected too on your site. None means the image is unclickable.
Size: Allows you to control what size you’d like to display your image, from full size to thumbnail.
…

Personally I’ve noticed a dramatic increase in volume of traffic since really putting the effort into making sure my images are properly tagged and search engine ready. By looking at you stats page you’ll soon begin to notice the increased referrals coming from the likes of Google images etc. Here’s a quick example of a few recent posts below that still manage to get new traffic on a daily basis thanks to savvy tagging & Alt Text…
Example 1: Maybelline Colour Show Nail Polish in Pink Party Dress
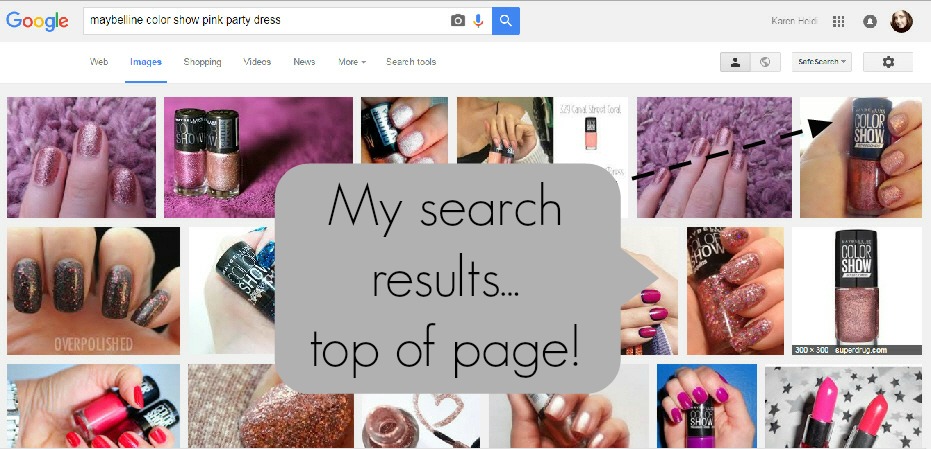
This particular feature (above) was posted back in September. Just a few months later it’s already top of the image search, even above Superdrug’s own catalogue image which is directly below. Not bad for adding a few extra words into a box chums 😉
.
Example 2: NYC Shine In A Minute in Prince Street
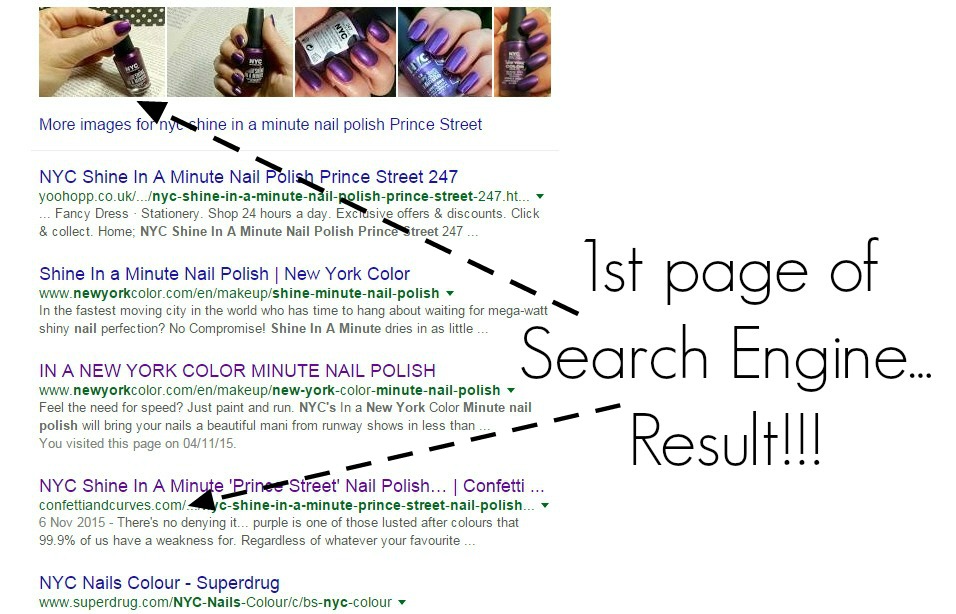
This feature (above) was only posted a few weeks ago and already it’s top of the search results & images. The power of good search engine terms really does make a significant difference when it comes to boosting you up right up those rankings!
![]()
Are you tagging or lagging when it comes to making your images search engine friendly? Do you have any top tips for boosting blog traffic through images? Is this something you’ll be adding to your uploading routine? Whatever your thoughts I’d love to read them in the comments below, so do stop by & say a quick hello 🙂
Cheerio Chums…

…
Catch me on:

Fantastic tip Karen!!! I had heard of it, but with this post I know where and why I should start tagging like right now:-) I put it on my to do list to tag all my photos… phew… that’ll be quite a job,, but definitely worth it… thanks again, Kathleen
LikeLiked by 1 person
Hey Kathleen, so glad you found it useful huni… I do wish I had have know this myself at the beginning of my blogging journey but it’s all a learning curve right?! Just so chuffed it’s well appreciated to help others out that might not recognise how useful those little boxes are 😀 Fingers crossed you manage to sort the rest of your piccies, just remind yourself it’ll be well worth it in the end huni!! hehe Thanks for stopping by lovely wishing you a super week ahead 🙂 XXX
LikeLiked by 1 person
Hey Karen, one more questions about this tagging… I’ve got photos in my media library which I can tag, but I’ve also got photos on flickr which I use for my blog. I guess I have to alt-tag these photos as well? Thanks for your answer 🙂 Love, Kathleen
LikeLiked by 1 person
Oh gee Kathleen I’ve never used Flickr huni so I haven’t the first clue about how it works!!! I would imagine you would have to as well… but that’s a guess… so sorry!!! However if you find out do let me know as it’ll be good to keep note off!! XXXXXX
LikeLiked by 1 person
too bad 😉 I’ll work it out… sooner or later 😀
LikeLiked by 1 person
Hope you do huni, let me know if you do find out though 🙂 XXXX
LikeLiked by 1 person
Thanks for sharing Karen! I love all your blogging tips ☺️
LikeLiked by 1 person
Awwh thank YOU for stopping by and leaving me such a supportive comment huni, really appreciated *hugs* Hope you have a super week ahead lovely lady 🙂 XXXXX
LikeLiked by 1 person
Well worth examples that are an exceptionally good source of info for any blogger.
LikeLiked by 1 person
Thank you so much 🙂 Always good to show others first hand the benefits that they might be missing out on too. If it helps just one blogger I’ll be a happy girl 😀 Thanks so much for such a supportive comment, much appreciated lovely 🙂 XXXX
LikeLiked by 1 person
Rightly said and moreover, it is a such a pleasure to share some benefitting things to others.
LikeLiked by 1 person
Very very true 🙂 XXXXX
LikeLiked by 1 person
Thanks for sharing these great tips
Candice | Beauty Candy Loves
LikeLiked by 1 person
Always welcome Candice, thank YOU for stopping by 🙂 XX
LikeLike
Amazing tips, this really does make all the difference 🙂
LikeLiked by 1 person
Thank you so much huni, glad you enjoyed the post 😀 Stopping by yours very soon to catch up on todays post chum hehe 🙂 XXXX
LikeLiked by 1 person
Doing the daily blog round, such a relaxing routine 🙂
LikeLiked by 1 person
lol I do love it too Anne, though this week has been a killer for me – just about getting on to reply to comments!!! Soooooo busy *sob* Hope all well with you sweetie… shall be popping back at random times over the next few days to make sure I keep up with my twinnies features 🙂 XXX
LikeLiked by 1 person
Oh I know: the december rush has started already! Same issues here, can’t wait for Christmas and some time to relax 🙂
LikeLiked by 1 person
Me too Anne, the thought of doing absolutely nothing is sooooo so appealing right now!!! 😀 XX
LikeLike
Fantastic, easy-to-follow advice! Thank you so much 😊 x
LikeLiked by 1 person
Hey Zoe, what an encouraging comment – thank YOU so much huni 🙂 Really glad you enjoyed the post!!! XXX
LikeLiked by 1 person
Oh my goodness! I have been guilty, and I mean guilty as in being lazy and skipping this whole process when adding pictures to my posts. I never knew it meant incoming traffic. Thanks so much for the tutorial Karen! ~Elle
LikeLiked by 1 person
Awwh Elle, it’s so easily done – I was just saying to another blogger how I wished I’d have known this at the start of my blogging journey but it’s all about learning & recognising how helpful these little things can be… thankfully it’s easy enough to go back and re-add key words in, after which it should only take a matter of weeks before it’s picked up on so have patience and you’ll hopefully notice the rewards 🙂 Have a lovely week ahead huni XXXX
LikeLiked by 1 person
Fantastic pointers! 👍🏻👍🏻
LikeLiked by 1 person
Thank you so much Jennifer – greatly appreciate the feedback huni 🙂 Xxx
LikeLiked by 1 person
Thank you! I’ll have to start trying this out for now on! You’re the greatest karen!
LikeLiked by 1 person
Shandel you’re too sweet 😀 What a smile inducing comment hehe Fingers crossed you’ll notice the difference, it’s amazing how a few little words can make a big change 🙂 Hope you’re keeping well huni XXXXX
LikeLiked by 1 person
You always have the best ideas and options when creating a great blog, post, etc. it’s fun getting creative and making your blog your own and showing your personality and creativity. Hooooooooray 🙂 xoxo
LikeLiked by 1 person
Awwwh thank you so much Leah 😀 What a compliment!!!! Who knew I had so much creativity bubbling underneath these finger tips lol lol You’re so darn encouraging – thank YOU!!!!!!! *huge hugs* XXXXXX
LikeLiked by 1 person
You definitely do have so much creativity!!! I know it, Flora, Owlivia and Barry know it too 🙂 *hugggggs* from NorCal xoxo
LikeLiked by 1 person
Awwwh thanks huni 🙂 XXX
LikeLiked by 1 person
💜😘💗
LikeLiked by 1 person
These are some great tips! Thank you!
Anita,
http://www.anitasdiaries.wordpress.com
LikeLiked by 1 person
So welcome Anita – really glad you like them, thank you for stopping by and saying hello 🙂 XXX
LikeLiked by 1 person
Karen this is actually really informative. I’m going to sound like an ass, but I was going to skip reading this post cause I thought “I know how to upload pictures” (not in a “I’m a jerk way” but you do a lot of awesome beginner posts so I figured this was more for that) but I really had no clue about the difference between the caption/alt/title stuff. You’re brilliant as always! Thank you for sharing your genius!
LikeLiked by 1 person
lol lol Oh Kaily you do make me smile huni!!! 😀 Firstly thank you soo much for the genuinely awesome comment – however I can assure you I’m no where near genius, but for the fact I’ve had a tough day I’ll take the compliment and revel in it for a while lol 😉 I totally get what you mean though, I usually do enjoy writing for beginner bloggers… it seems to be my thing, but it is quite surprising the amount of experienced bloggers that don’t realise what these are as well. Just glad I could be of help in bringing you up to speed on the difference huni, at least you’re now clued up on the jargon most of us totally ignore when uploading 😀 Hope you’re keeping well, have to get over for a wee catch up with you chummy!!! XXXXX
LikeLiked by 1 person
Excellent advice! It took me a few months before I realized I should be doing this. Also (maybe you already know this) but the Alt Text automatically populates the text field when someone goes to pin your image! Very handy to have a professional looking description ready to go on your pin-able content 🙂
LikeLiked by 1 person
Thanks so much indeed huni 🙂 I’ve been doing it for about 4/5 months now too and pretty impressed with how much of a difference it makes though it does take a good bit of time to go back and ammend the other images *grrrr* Thank you sooo much for sharing that info, really helpful Mil!!!!! Very good point about it making the image look professional too 🙂 I take it you mean on the pinterest text field? XXXX
LikeLiked by 1 person
Yep, exactly! If you don’t do it, it either comes up blank or pulls the first few lines of text from the post, which is annoying. So many little tricks here and there! Thanks for sharing your knowledge 🙂
LikeLiked by 1 person
Ahhhhhh of course… you see I’m not on Pinterest Mil so haven’t really had the opportunity to check that out but well observed girl and a very valid point to remember!!!!! Thanks so much for this info, really does add to getting it right huni 🙂 XXXXX
LikeLiked by 1 person
Just brilliant…although I am totally lagging. 😢 My next post images will be optimised to within an inch of their lives! 😀 Thank you.x
LikeLiked by 1 person
lol lol This made me giggle so much Traci Ann 😀 hehe You’ll be whizzing to the top of Google before you know it huni. So very welcome 🙂 Have a super week ahead XXXXX
LikeLiked by 1 person
I am literally going to spend all weekend googling my own images!!! LOL! 😂
LikeLiked by 1 person
LOL!!!!! That sounds like something I’d do – sad thing is I have the screen shots above to confirm what I did on my riveting Friday night!! The life of a blogger eh?! lol XXXXXX
LikeLiked by 1 person
Hahahaha! It’s just dedication…and that rush when you see a spike in traffic! 😀👍
LikeLiked by 1 person
Sooo true…. I’m like ‘AHHHHHH that’s MEEE… MY wee blog piccies… right there’ of course hubby is confuddled what all the fuss is about but like you say it’s seeing the results lol xxxxxxx
LikeLiked by 1 person
Great post. Will be sure to spend some time on these niggly bits X
http://Www.prettylittlestatement.wordpress.com
LikeLiked by 1 person
Thank so much lovely, and of course for stopping by 🙂 Delighted you enjoyed it!! Hopefully you’ll notice the results very soon!! XXX
LikeLike
If I had a light bulb over my head, then it would have just lit up when reading this post. I absolutely never fill out those sidebars when uploading a photo and now I feel real dumb for not doing so from the beginning. I also tag the post itself, but not the photos. Goodness gracious!
LikeLiked by 1 person
Noooooo don’t feel dumb huni, not at all!!!! Sooooo many of us just don’t realise what they’re for or how valuable they can be!!! Took me a while to get it but now you know you’ll be popping up all over Google lol Learning curve for us all huni 😉 XXXXXXX
LikeLike
First of all, I have to say that I love your blogging tips posts! I always learn so much from reading them!! Second, I have heard that an image should always be positioned at the right side of the page, because the search engine can’t identify an image if it’s on the left side of the page, and therefore the post won’t show up as a result. And lastly, your images are always gorgeous! Is there a special camera or technique that you use? And what are you using when you edit them and add text to your photos? If you’ve already covered this in another post, please send me the link 😉.
LikeLiked by 1 person
Awwwh Mistie thank you soooooo so much – that’s really made my day 🙂 Smiling from ear to ear reading such a supportive comment!!!! So glad you enjoy them so much, if it just helps one person I’m a happy gal 😀
Oooh I’ve never heard of that before but I’m definitely going to look into the positioning of images! I always centre mine and haven’t had any issues with them not appearing but have never put them to the left to see if it cancels out the results. How interesting!!!! Thanks for bringing that up as it could be a very valid point to help in optimizing!!
No technique in the piccies, just point & click I’m afraid! The camera I use is actually a Sony Handycam as I use it for recording videos as well, it’s fantastic and at around £100 is expensive but such a good investment seeing as I use it all the time 🙂 Having said that I’ve seen some amazing iPhone shots! I always think a plain white background works best for me… Just helps to bring out the colours a bit better 😀 Actually here’s two links to posts that you might like to read re photography…
http://confettiandcurves.com/2015/11/09/10-photography-backdrop-ideas-for-budding-beauty-bloggers/
http://confettiandcurves.com/2015/06/15/my-top-five-basic-photography-tips-for-beauty-blogging/
Thanks again for stopping by and leaving such a lovely comment – huuuugely appreciated 🙂 XXXXXX
LikeLiked by 1 person
This post is a true game changer! I have found my afternoon blog project aka productive procrastination 🙂 would you mind if I reigned this?
LikeLiked by 1 person
Awwh thank you Cyndel – I’m so glad you enjoyed it huni 🙂 Haaa what a brill way to procrastinate huni lol lol Reigned it? Oooh what’s that mean? Sounds interesting but I havne’t a clue what it is chum lol XXXXXXX
LikeLiked by 1 person
Lol I meant reblog, my phone autocorrected!
LikeLiked by 1 person
Oooooh right lol lol Yes, go for it huni, never need to ask – it’s such a compliment getting a reblog 🙂 Glad you clarified that – thought it was some new form of social media malarkey lol XXXX
LikeLike
Such an awesome post! These are really great tips Karen! 🙂 I always love your posts on improving blogging skills! I feel so out of practice lately! I need to get my groove back somehow lol. XXXXX
LikeLiked by 1 person
Pffft, you out of touch?! I think not chummy – you’re an old pro at blogging!!!! you could teach us all a thing or two lol Glad you enjoyed the post, I do love writing these advice ones as I had so many questions when I started off so I always keep hopeful that it might help other newbies too huni 😀 XXXXx
LikeLiked by 1 person
Haha! Yes me out of touch! I would like to make some changes to my blog eventually. I know who to ask for advice when I need it! 😉 XXXXX
LikeLiked by 1 person
You’ve a gorgeous blog chum, it’s fab just the way it is but I know what you mean about updating – I’m hoping to give mine a bit of a facelift in the new year, just need to find the time at the moment to get my ideas together!!! If only i could win the lotto and fund my blogging lifestyle hehe XXX
LikeLiked by 1 person
Awww thank you! I probably will leave it the way it is for a while. Finding the time can be hard to make changes can be hard. Winning the lotto would be amazing!! lol! 😀 XXX
LikeLiked by 1 person
Just right – and yes I totally get you on that, it’s time consuming as it is! I’d literally need to lock myself away for a week of solitary confinement to get that much done lol Let’s just keep buying those tickets & hoping chummy 😉 hehe XXXX
LikeLiked by 1 person
Reblogged this on By Cyndel and commented:
Hello there Bees!
Honestly, this post from my good friend Karen over at condettiandcurves.com is a game changer! Check it out, and pop on over to Karen’s site for more 🙂
LikeLiked by 1 person
Cyndel thank you so so so much huni – what a lovely thing to say! Utterly chuffed you enjoyed the post and can’t thank you enough for sharing it chum 🙂 XXXXX
LikeLiked by 1 person
Pingback: Keeping Up With Karen… | Confetti and Curves
Pingback: Blogging Experience | the jasch journal
I enjoyed your post. I started using a watermark on photos recently and I think it helps too. Love the tagging tip! I could spend ions on this photo project 🙂
LikeLiked by 1 person
Thanks so much Donna, hoping to cover watemarks in a future post lovely, certainly a great point to note! Thanks so much for stopping by and leaving such a great comment lovely 🙂 XXX
LikeLiked by 1 person
Hi Karen. Looking forwards to learning more things from you! I added a photography section to my website for fun😊
LikeLiked by 1 person
Hi Donna, lovely to meet you 🙂 Thanks so much for stopping by – will definitely get over to your blog to check it out!!! Glad you enjoyed the feature XXX
LikeLiked by 1 person
Thank Karen😋
LikeLiked by 1 person
Great tip!! I have been doing this to all my pics since I started the blog because I happened to have read about it on someone else’s blog tips post and it truly does help!
LikeLiked by 1 person
Thanks so much Nena 🙂 I’ve only been doing it seriously for a matter of months, but like you say it really does make a difference!! Thanks for stopping by huni XXX
LikeLiked by 1 person
Always a pleasure, Karen:) XOXO
LikeLiked by 1 person
❤ xxxxx
LikeLiked by 1 person
Pingback: 10 Tips for a Thriving Blog! | By Cyndel
Amazing post hun and I love these blogging tips, they are so helpful and also fun to read 😀
LikeLiked by 1 person
Thank you so so so much Galit – makes it all worth while reading awesome feedback like that! Much appreciated huni XXXX
LikeLiked by 1 person
Awww 💖 Yoir posts always inspire me hun 😄
LikeLiked by 1 person
Thank you SO much – that is such a huge compliment Galit ❤ You're amazingly supportive in every single way XXXXX
LikeLiked by 1 person
((Blushing)) ❤
LikeLiked by 1 person
Pingback: Things You Need To Do Before Publishing A Blog Post… | Confetti and Curves
OMG this is soo helpful!!! Thanks so much for sharing this!! 🙂
http://alifyalifestyle.com/
LikeLiked by 1 person
You’re super welcome lovely 🙂 Thank you for stopping by and leaving such an encouraging comment ❤ XXXX
LikeLiked by 1 person
Wow Karen, such a helpful post, I will keep in mind to change the name of the uploaded image to a proper description. Thanks so much for sharing this knowledge, love you for this !!
xx
Saabri
LikeLiked by 1 person
You’re so welcome huni, I know it has helped me immensely!!! Brining lots of my images up top of google so well worth the check before publishing 🙂 Hope you’re having an awesome week lovely lady XXXXX
LikeLiked by 1 person
Pingback: *Update | Behind the Blog | What Paige?
It’s safe to say, I am officially obsessed with your blog. ❤ love everything about it from the theme to the content you produce. 🙂
http://www.allthingsnzuri.wordpress.com
LikeLiked by 1 person
Awwwwh thank you soooo much – what a huge compliment!!!! Think I may have to screen shot that and pop it on my pin board for days when lack of confidence hits lol!! Thank you again, truly lovely to read such kind and encouraging words 🙂 XXXX
LikeLiked by 1 person