

Happy Monday Blog Buddies…
It’s been a ridiculous length of time since I’ve tackled some crafty DIY projects, so this weekend I thought it was high time I put right to abandoning my craft drawers and got a little creative with a truck load of buttons I’ve had gathering dust in some containers. I must say I ADORE button craft and find them incredibly cute in almost any project, but seeing as I had a spare frame from Ikea and a rather bare looking bedroom wall I thought I could combine the two and tackle this cute heart shaped button collage to brighten up my boudoir decor. Fancy giving it a go yourself? Here’s how to do it…
.
The must-have ingredients:
One rather fabulous looking photo-frame – Ikea are great for a whole range of shapes & sizes to suit any budget
A small truck-load of buttons (well, maybe just a container full)
Glue Dots or Clear Drying Craft Glue
.
1) The Frame
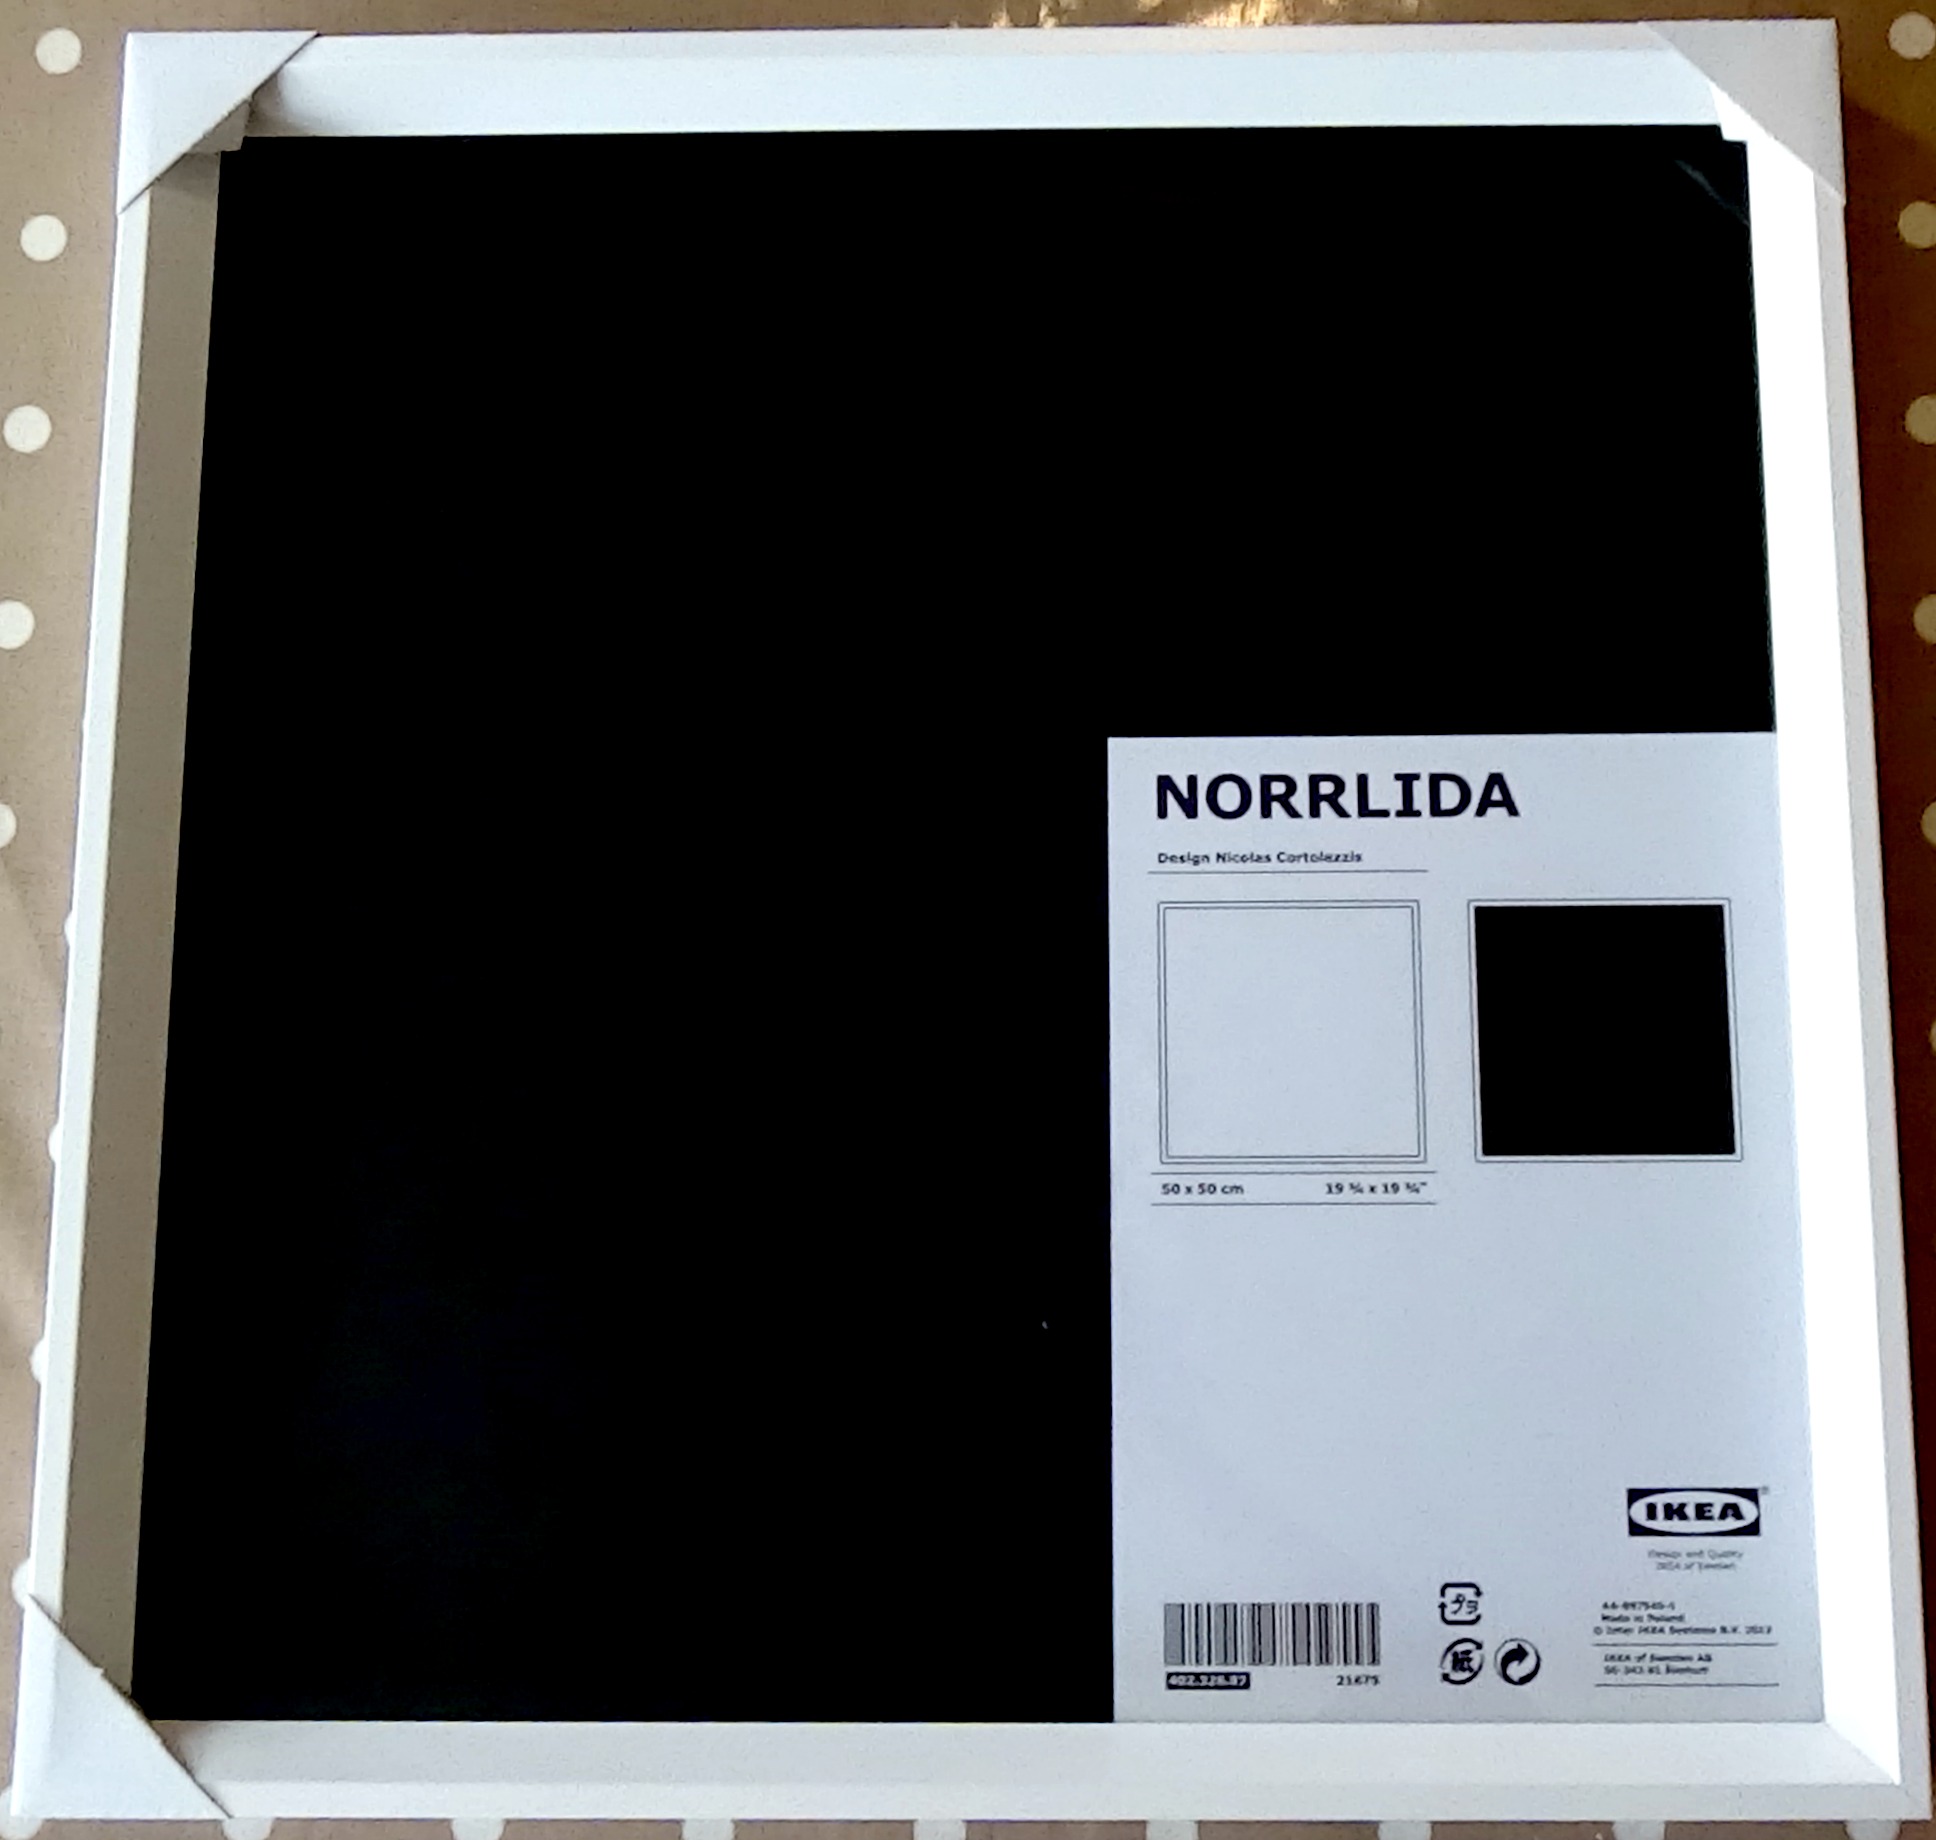
Firstly you’ll need to get hold of a decent size frame, however if your buttons are small enough I’m sure it could work equally as well in something a little more dainty. Steve bought me this frame from Ikea quite some time ago, it’s a very chic looking ‘Norrlida’ frame which is perfect for displaying a pop of colourful buttons! Measuring in at 50x50cm’s it’s quite a biggie, but seeing as it’s for a rather expansive wall it’s the perfect size for maximum impact.
.
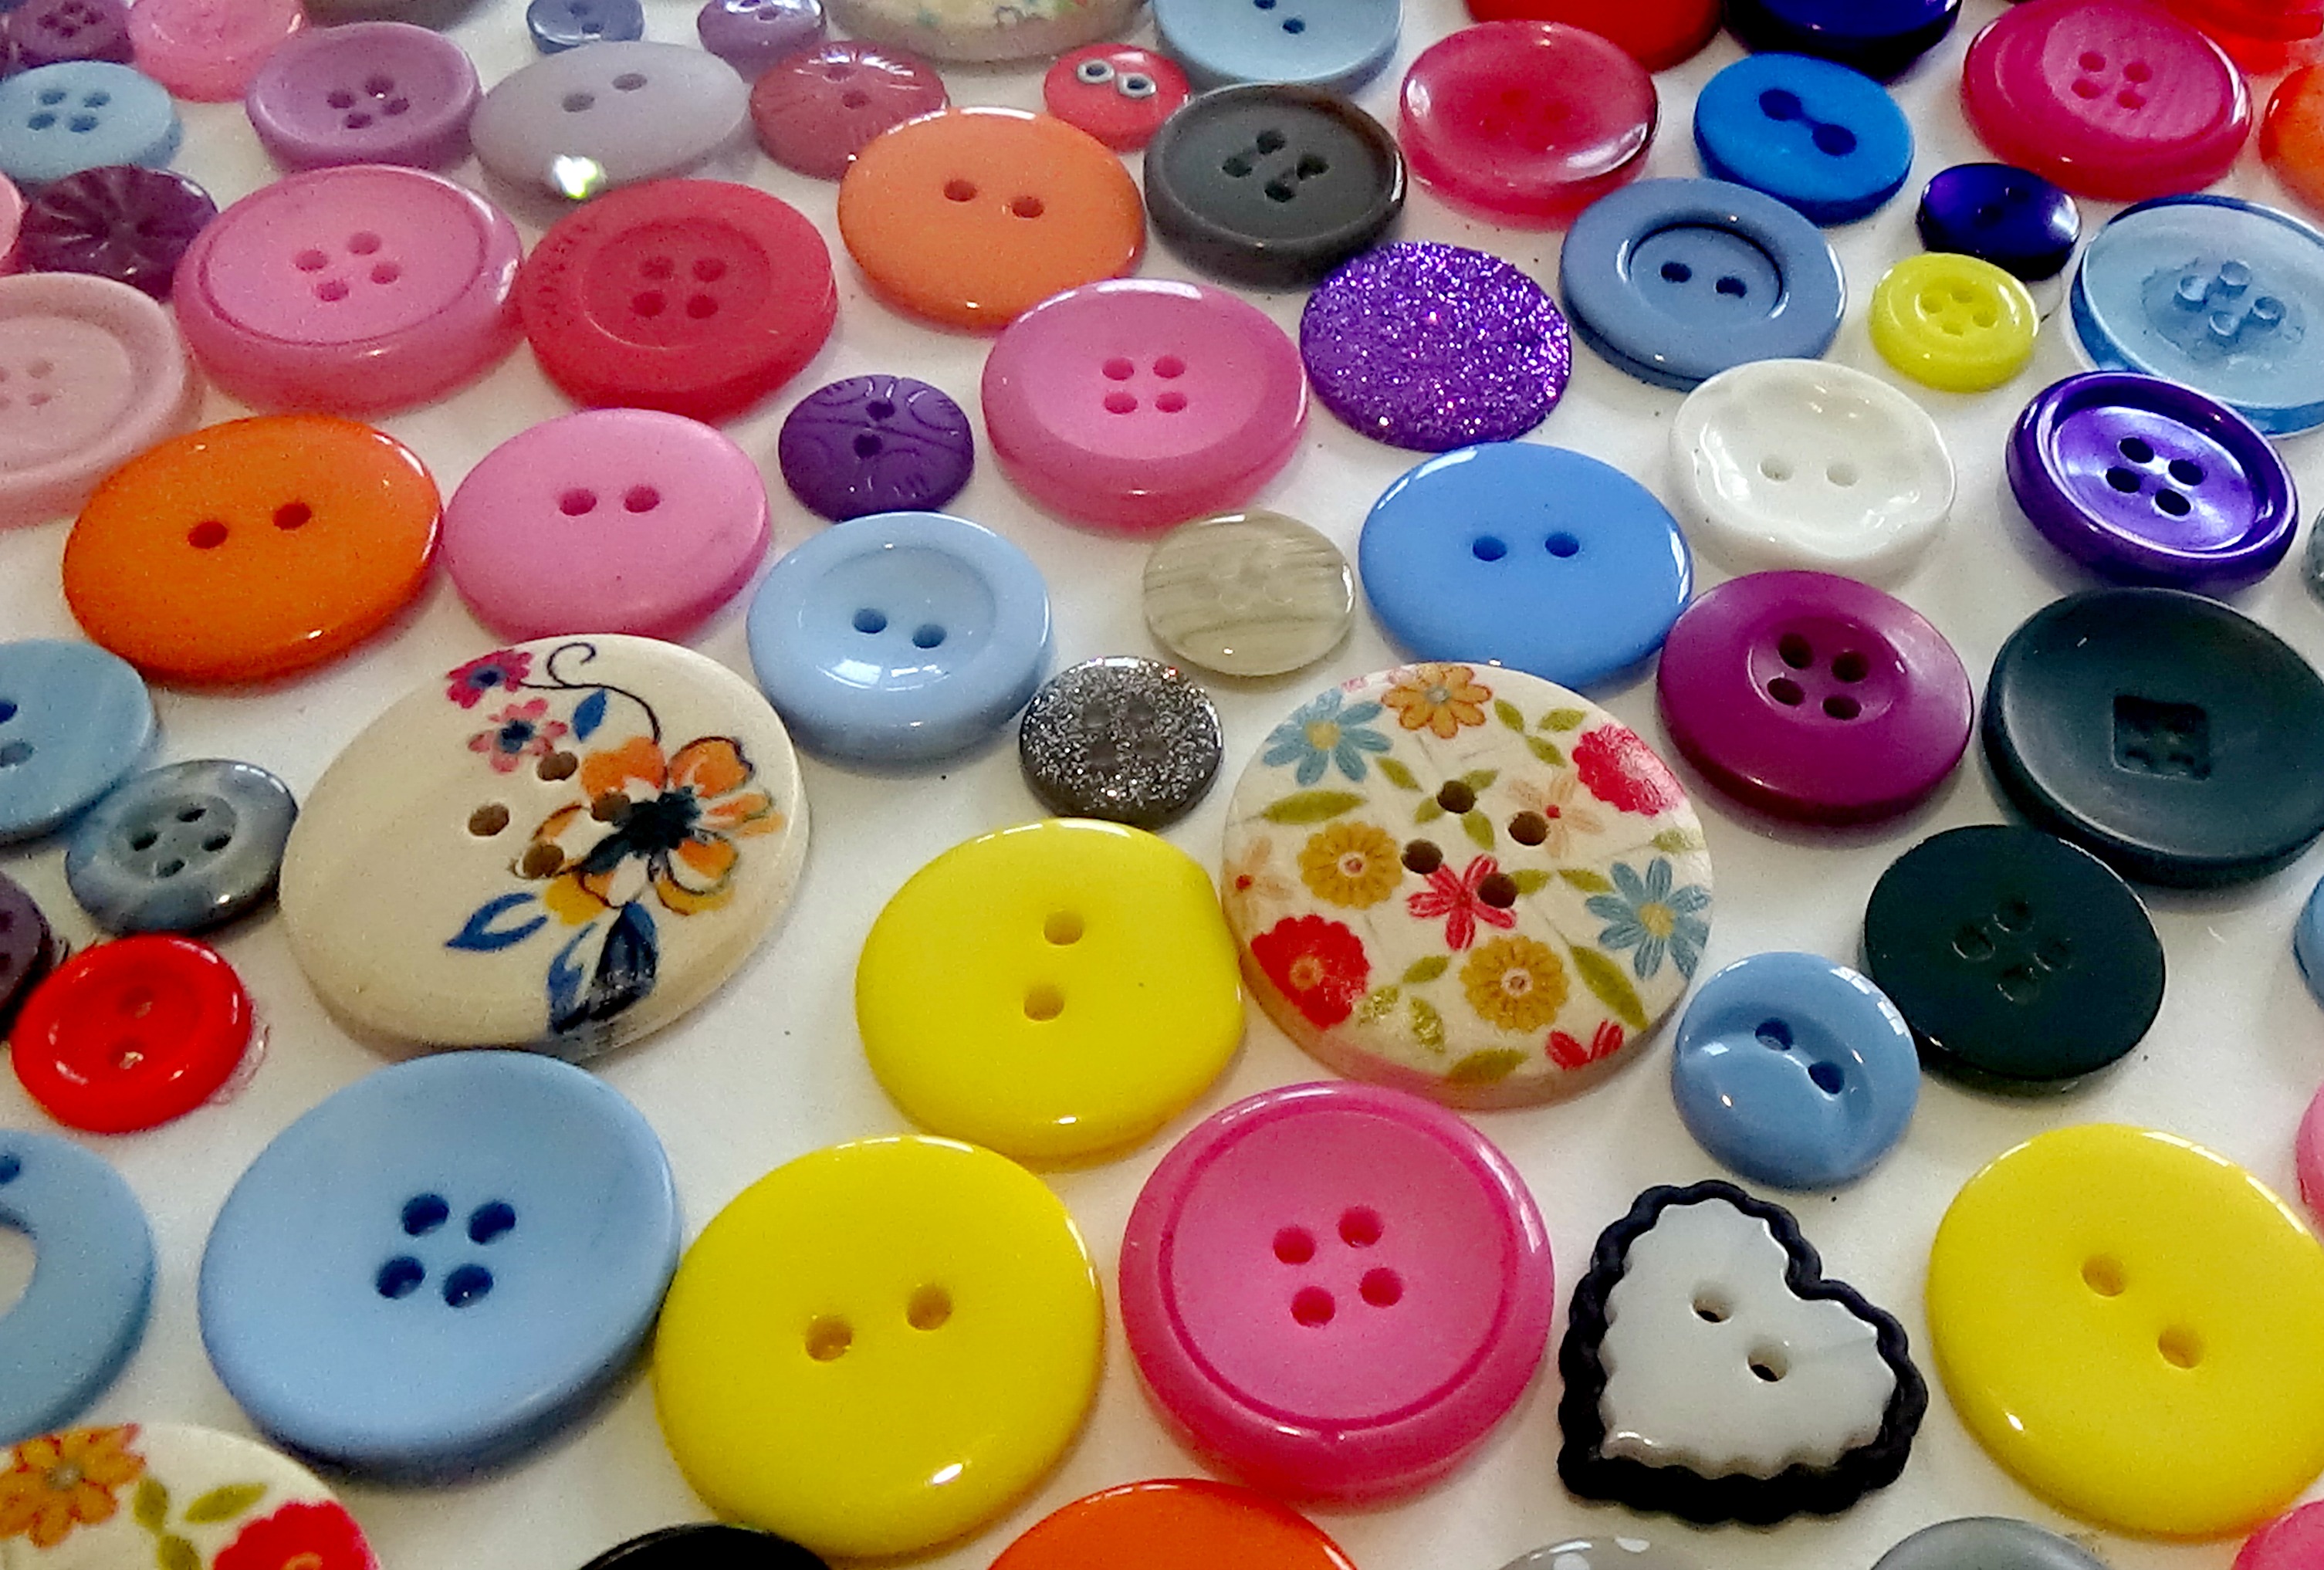
2) The Buttons
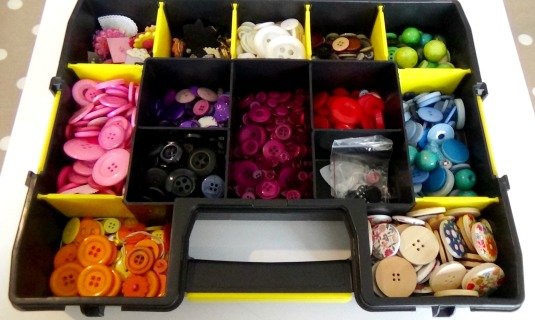
For this project you’ll need quite a few handfuls of them, of course all that depends on the size of frame and shape that you’re creating. I easily used 200-300 and kept it to a mixture of different colours so it would pull in accents of any room colour should I wish to hang it somewhere else. Both E-bay & Amazon have a great range of buttons for sale in packs of colours to suit whatever shade your heart desires. I personally think the blush tones are incredibly chic!
.
3) The Heart
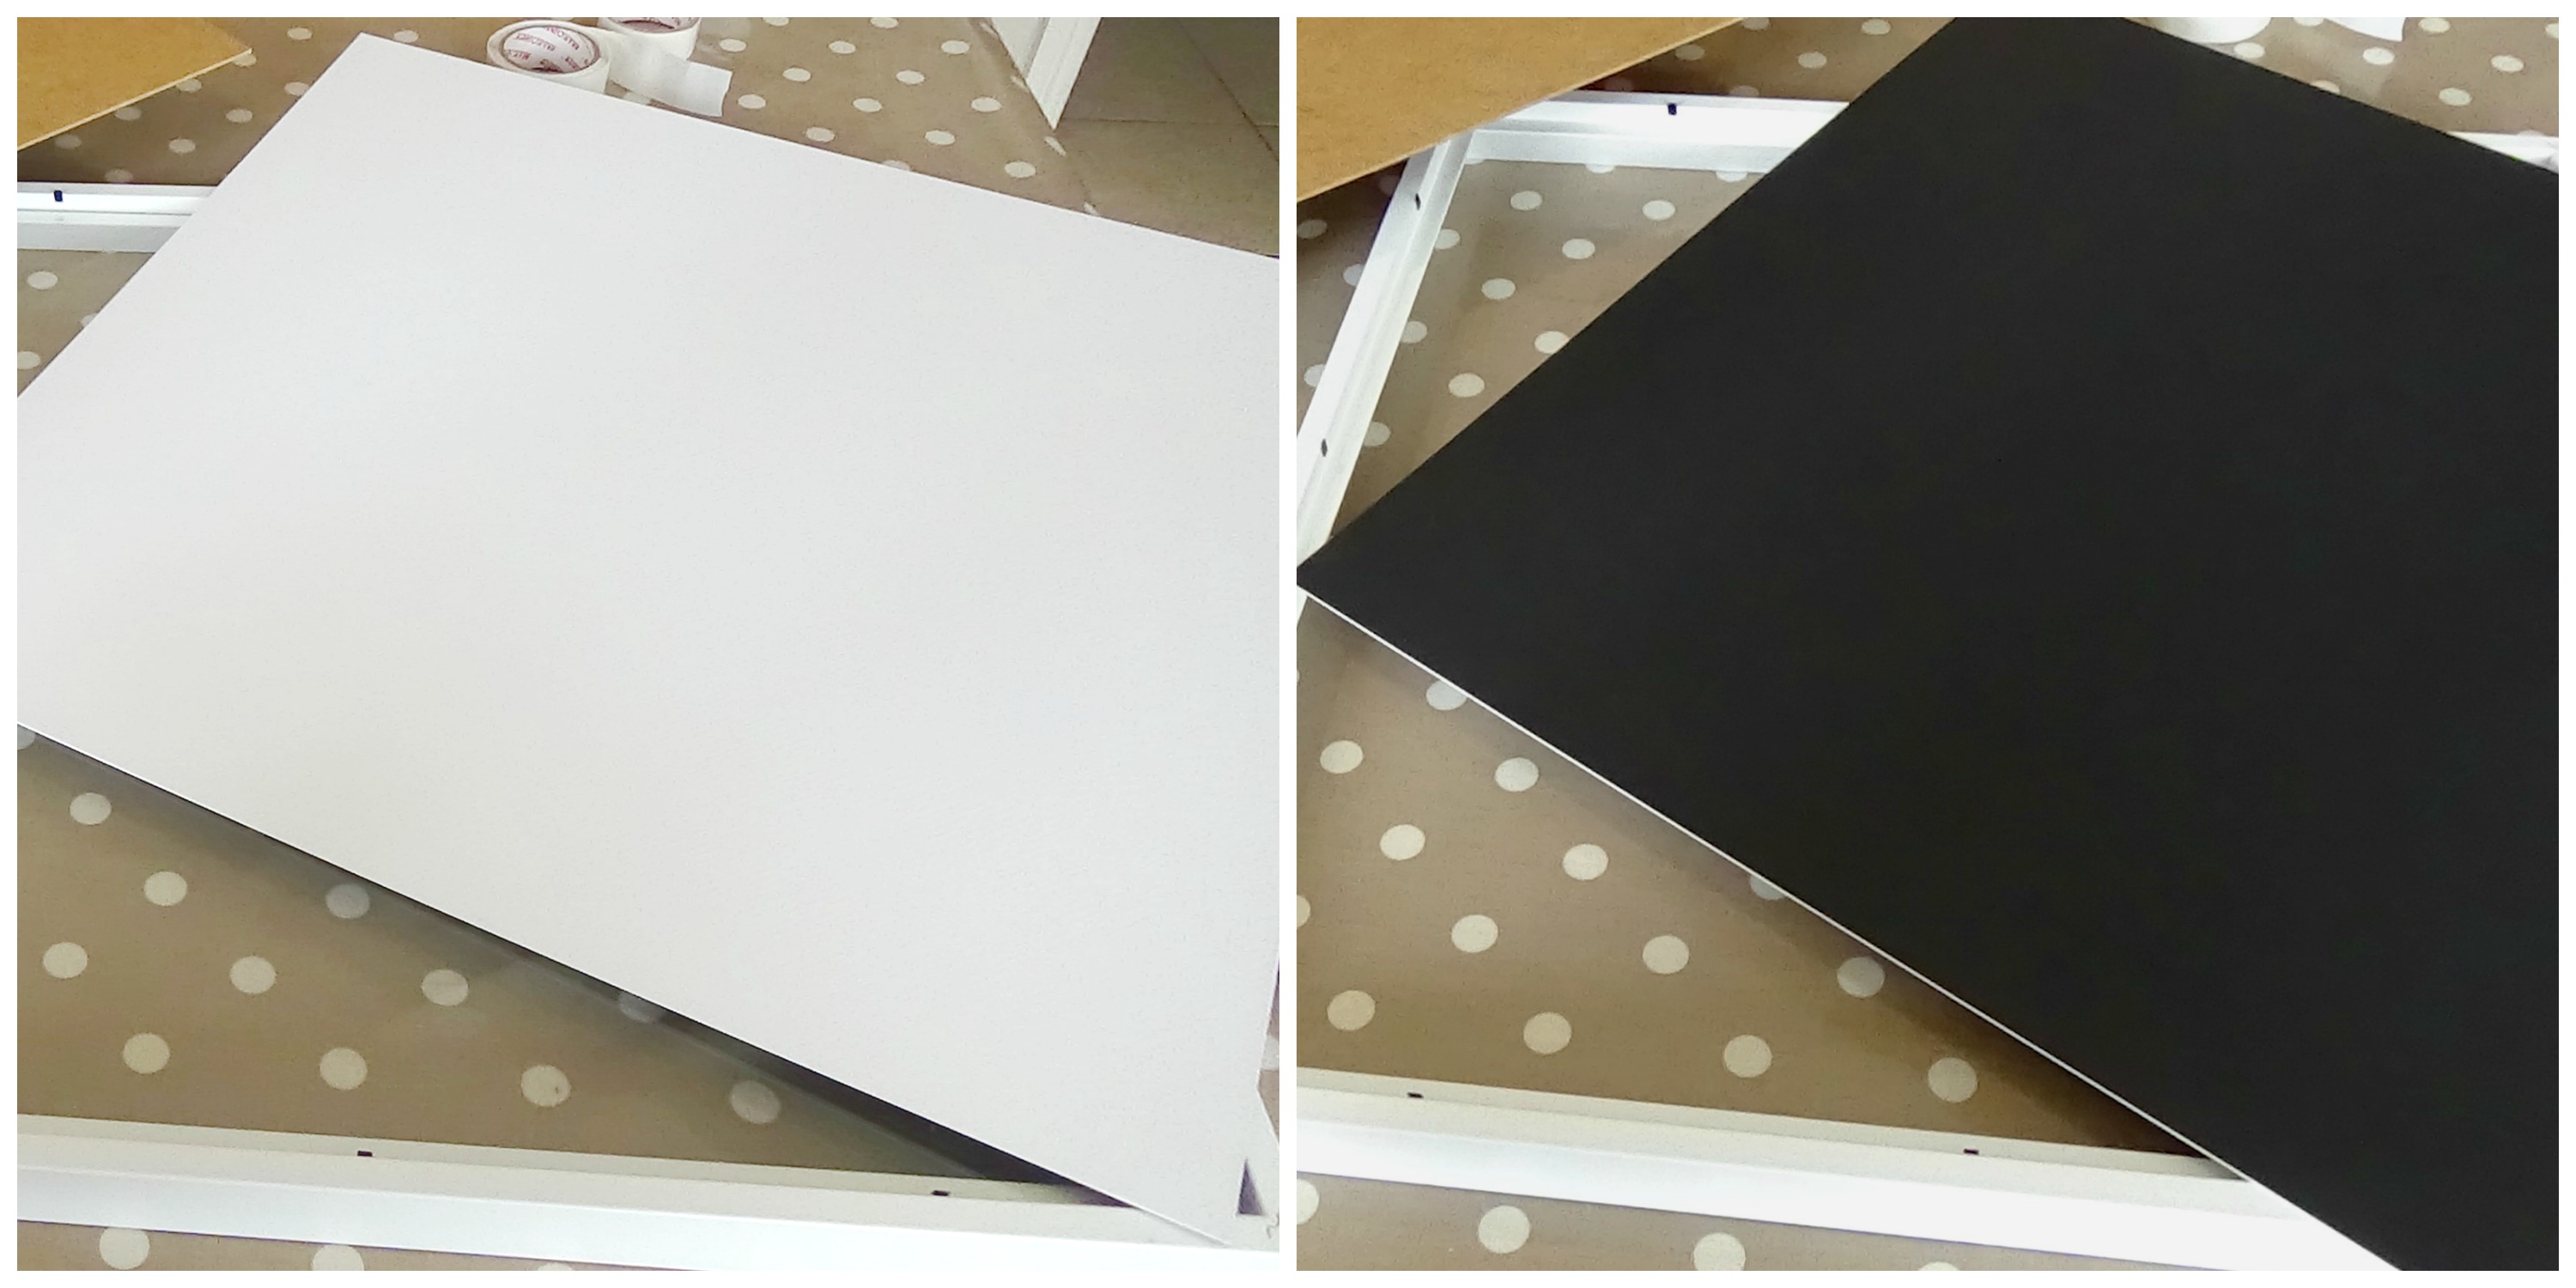
Now it’s time to roll up the sleeves and get on with the fun part… if you’re using the Norrlida frame remove the backing, take the strong cardboard insert & choose which colour you’d prefer the background for your buttons to be – black or white. I went for white as it will tie in a little better with the rest of the decor.

Next draw a large heart on the middle of the blank board. This doesn’t have to be too perfect as your buttons will take on a shape of their own… just try and keep the line as feint as possible.
.
4) Filling In
Carefully place a mound of buttons onto the canvas and begin to spread them out into the positioning & shape you want. After you’ve got the buttons placed where you want them to be it’s handy to take a quick snap of your picture, just in case any of them get misplaced or moved.
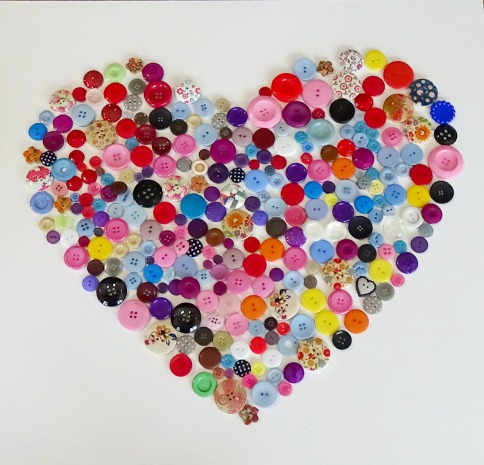
Keeping the buttons on the background, take your pack of sticky dots and begin to stick each button individually onto the canvas – this is by far the most time consuming of the whole project, mine took at least 40 minutes to place so I’d suggest you keep your laptop close by and stock up on your favourite YouTubers to keep you company. Ooooh, talking of which… you can check out my channel by *clicking here* 😉 hehe

As an alternative to sticky dots you can use clear-drying craft glue to affix your buttons with, however it is a little bit messier and will need a considerable amount of drying time before you can place your work of art into it’s frame – hence why I love glue dots. There’s no mess, just instant adhesive without the drying time!
.
5) You’re Done

Voila! Once they’re all stuck (and dried if using glue) then it’s time to house your button art back in the frame – this will test if you’ve missed any or not, which is why your picture earlier may come in handy.
Once the art piece is securely in its frame give the glass a little wipe with window cleaner to remove any smudge marks & get ready to hang your work of art for all to admire! I’m putting mine above my dressing table as it will work perfectly with all the coloured lotions and potions!
![]()
There you have it beauty buddies, my little weekend craft project. What do you think? Is this something you’d try? What colour would YOUR buttons be?
As always thanks so much for stopping by and don’t forget to say a quick hello in the comments below!
Cheerio Chums…


So cute!!xxx
LikeLiked by 2 people
Thanks so much huni!! 🙂 Glad you like it XXX
LikeLike
This looks amazing! I’m definitely going to try this out! Nicole x
LikeLiked by 2 people
Awwwh thank you Nicole 🙂 Oooh have fun giving it a go – it’s such a mess free & fun little project!! Xo
LikeLiked by 1 person
Mess free sounds perfect hehe. Nicole x
LikeLiked by 1 person
Mega cute. Might have to give this a go xx
LikeLiked by 1 person
Why thank you lovely lady 😀 I have to say I had such fun doing this – oddly therapeutic lol x
LikeLiked by 1 person
pretty! and you can use other shapes too with buttons 🙂
LikeLiked by 2 people
Absolutely – I was debating what shape to go for but a heart seemed to obvious one for me lol Glad you like it Nazneen 🙂 Have a great week XXXX
LikeLike
This looks so cool
CANDICE | BEAUTY CANDY LOVES
LikeLiked by 2 people
Thanks so much Candice 🙂 XX
LikeLike
Love this idea! Looks so pretty xx
LikeLiked by 2 people
Awh thank you Jo, you always leave such lovely comments 🙂 Hope you have a great week huni XXX
LikeLiked by 1 person
That is so cute and clever!
LikeLiked by 2 people
Not sure about clever Zoya (lol) but it is rather cute hehe! 😀 Thanks so much for stopping by – glad you like it huni ❤ XXX
LikeLiked by 1 person
That’s soooo cute! xxx
LikeLiked by 2 people
Thanks so much huni – glad you like it 🙂 XXX
LikeLiked by 1 person
Awe this is such a cute project!!! I love it!! 🙂 XXXX
LikeLiked by 2 people
Thank you so much chummy – I really did enjoy making it, rather therapeutic I must say lol Glad you like it Katie ❤ XXXXXX
LikeLiked by 1 person
You’re welcome Karen! I love doing projects like that and I should try to make one sometime too. ❤ XXXXXX
LikeLiked by 1 person
You really should Katie – I’m sure it would turn out lovely 🙂 Thanks again huni XXXXX
LikeLiked by 1 person
Awe you’re welcome Karen 🙂 XXXXXX
LikeLiked by 1 person
Oh I love the look of this! So nice and quite easy to do 🙂 Even clumsy me might succeed with this project.
xxx Anne
LikeLiked by 2 people
Honestly Anne it was so nice doing something so easy peasy… anything that involves mess and mayhem I get a tad flustered with lol And yes even the clumsiest of crafter can get this right – I’m living proof of that haha Hope you have a lovely week chum XXXXX
LikeLiked by 1 person
Hihi, I know. Fool proof makes you really relaxed. When it all gets complicated I panic a little and that’s where it usually goes totally wrong.
Week going great so far, hope you are having a great one as well.
xxx Anne
LikeLiked by 1 person
I swear it’s like I’m replying to myself here Anne, we really are too alike lol lol Complications = panic = project abandoned!! haha
Glad your week is going well lovely lady – all well here too *hugs* XXXXX
LikeLiked by 1 person
Totally, we truly must find something to disagree on soon.
xxx Anne
LikeLiked by 1 person
lol lol I read a story last week in one of those weekly magazines about two girls who started chatting on Twitter (or some social media thing) and eventually found out they were secretly related… I’ve just noticed that even our little Gravatar pics are virtually the same angle. Could it be Anne?!?!? 😀 hahaha XX
LikeLiked by 1 person
Oh that would be perfect! I could move to Ireland 😀 My mother and I always joke that we must have been English or Scottish in a former life because we feel so at home there, so Irish isn’t much of a stretch 😀 xx
LikeLiked by 1 person
haaaa brill!!!!! You just never know lol lol XXX
LikeLiked by 1 person
It’s cute and simple!
LikeLiked by 1 person
Thanks so much – glad you like it lovely 🙂 X
LikeLike
Love this DIY! Thanks for sharing this great idea 🙂 I have more than enough extra buttons lying around to make this!
LikeLiked by 1 person
Awwh thank you Amanda – so welcome 🙂 Oooh sounds like you’re all stocked up & ready to go… just need a frame & it’s almost done lol Thanks for stopping by huni XXX
LikeLiked by 1 person
I am not a crafty person but this looks amazing hun, I love this ❤
LikeLiked by 2 people
Well there is no bigger compliment than impressing a non crafty person – hehe 😀 Glad you like it Galit & thanks so much for the lovely comment *huge hugs* XXX
LikeLiked by 1 person
😀
LikeLiked by 1 person
So cute and creative, Karen! I would definitely do this 🙂
LikeLiked by 1 person
Thanks so much huni, I’m glad you like it!! Hope you get the chance to give it a go too – it’s so much fun 😀 X
LikeLiked by 1 person
It looks like a fun piece to hang up and a good conversation piece too!
LikeLiked by 1 person
Very much so Jamie – it’s very bright and colourful, wouldn’t mind doing one in blues/greens for my bathroom but in the shape of a boat… sounds weird but I think it could work out nice 😀 XXX
LikeLiked by 1 person
You should do it! And share the final result 🙂
LikeLiked by 1 person
I really should… need to get Steve to buy me another frame first lol X
LikeLiked by 1 person
Maybe he’s reading this and will get the hint 😉
LikeLiked by 1 person
You just never know Jamie… either that or I’ll just have to tell him straight up!!! lol x
LikeLike
That’s so cute! I love that all the dots are very different but still go together so well! It might be a bit too girly for what my boyfriend would allow me to hang, though, lol. x Nanna
http://www.bottledindenmark.com
LikeLiked by 1 person
lol lol Thank you Nanna – yes, I’ve had an eyebrow raised from Steve but being married for a few years now he’s accustomed that his protests won’t get him anywhere!! It’s on the wall now!!!! lol XXXXX
LikeLiked by 1 person
I loveeee it! I made one before out of pink buttons when I was bored one day but it got moved before I could stick them down!
Much prefer your one though – it looks lovely with all the different buttons xxx
LikeLiked by 1 person
lol Natalie 😀 Thank you sooo much huni, I’m glad you like it!! Ooooh pink buttons together sound lovely, I didn’t have enough of one colour or I might have done that too!! Awwh thank you again for the lovely compliment – you’re such a gem *hugs* XXX
LikeLiked by 1 person
I just love that little DIY! And we all know IKEA has the best supplies aka the frame you showed. Those colorful buttons are so cool with all the different colors and the shapes. Such a crafty idea. No surprise you came up with this 😀 it can make a drab room turn fab instantly! Brava, brava 🙂 xoxo
LikeLiked by 1 person
Hey lovely Leah!! 😀 Isn’t Ikea just a treasure trove of house goodies?!? So good!!! Glad you like it huni – I had to get rid of all these buttons some how lol Drab turned fab – love it hahaha Hope you’ve had a great day 😀 *hugs* XXX
LikeLiked by 1 person
No, IKEA is not a treasure, it’s a pleasure hahaha 😀 drab turned fab indeed. You’re always so creative. I need to take lessons from you aka the expert 🙂 my day just kind of started, so we shall see how the rest of it pans out. I hope you’re having a stupendous Monday!! Huggggg xoxo
LikeLiked by 1 person
Ahh I’m afraid I’m a mere beginner at all this art & crafts stuff… as long as it’s relatively simple and not too messy I’m up for giving it a go lol Hope you have a great day ahead lovely 🙂 XXXXXX
LikeLiked by 1 person
You say you’re a beginner, I say you’re a great beginner 🙂 oh yes, not to messy. But if it’s messy I’m sure Steve won’t mind helping clean up. And in my case, I’m sure Flora won’t mind helping either. Is it Friday yet?? Xoxoxo
LikeLiked by 1 person
Awwh thank you 🙂 That’s so lovely! Let’s hope Friday comes soon!! XXX
LikeLiked by 1 person
I will do my Friday jig and then it’s bound to come a lot sooner!! 🙂 xoxo
LikeLiked by 1 person
Yaaaaay – go for it !!!! 😀 XXX
LikeLiked by 1 person
Are you going to join in on the festivities?! 🙂
LikeLiked by 1 person
I may just have to sit this one out – I’m pooped Leah!!!! lol XXXX
LikeLiked by 1 person
Okey dokey solo dolo little jive I’ll do 🙂 oh and happy salad day! 🍔 there’s a hamburger. That looks like a salad right??! 😀 xoxo
LikeLiked by 1 person
Course it does – plus there’s salad in a burger so that’s healthy enough lol Have a great day huni 😀 XXXX
LikeLiked by 1 person
Salad in a burger? Oh, you mean because of the lettuce. Ha good one. I hope you have a great day. Well evening in your case 🙂 xoxo
LikeLiked by 1 person
Oh and here I am doing my jig 👯 (even though it’s two people) pretend it’s one :))
LikeLiked by 1 person
Looking very jiggly indeed lol XXX
LikeLiked by 1 person
Is it Karen approved?! 🙂 xo
LikeLiked by 1 person
Sure its 🙂 XXX
LikeLiked by 1 person
Yayyy! 🐒here is a monkey for you! 🙂
LikeLiked by 1 person
Love this DIY! It’s so simple but so cute!
LikeLiked by 1 person
Awwh thank you Lauren – such a lovely comment, glad you like it huni! 😀 XXXX
LikeLiked by 1 person
This is such a cute and easy DIY! Instead of buttons, I’m envisioning using photos of my friends and family, but doing a sort of collage in the shape of a heart…but I should probably restrain myself as I don’t really have any wall space left 😉 Great post, Karen!
LikeLiked by 1 person
Oooh that would be gorgeous Mil, I would love to see how that would turn out – you’ll have to give it a go sometime 😉 Awwh thanks so much for the kind comment huni – wishing you and Jules a great week ahead XXXX
LikeLiked by 1 person
Very cute!
LikeLiked by 1 person
Thanks so much lovely 🙂 X
LikeLiked by 1 person
I have a ton of buttons … So clever & So cute! Such a great idea Karen xo’s
LikeLiked by 1 person
Awwh you should try it out then Ingrid – it’s so easy!! Thanks for stopping by lovely 😀 XX
LikeLiked by 1 person
Love the heart and how you snuck in your YT Channel. 😉
LikeLiked by 1 person
Why thank you huni 😀 Oooh did you spot that little advertising move then?! hehe 😉 lol xx
LikeLiked by 1 person
I almost missed it. You had to read very closely, lol. 🙂
LikeLiked by 1 person
lol lol – next time I’ll go with a flashing banner… just to be sure 😉 haha XXX
LikeLiked by 1 person
Good idea 😉
LikeLiked by 1 person
This is so adorable! I’ll definitely have to add this to my ever-growing list of summer DIY projects! 😀
xx Jessica
LikeLiked by 1 person
Awwh thank you Jessica – glad you like it 😀 Oh yes, a great DIY for a rainy day over the summer months!! XXX
LikeLike
Very cute!
LikeLiked by 1 person
Thanks so much Emma 🙂 XXX
LikeLike
This is a really cute idea I would love to do with my boys.
LikeLiked by 1 person
I’m sure they’d love it too Jen… always great for a rainy afternoon 😀 Hope you’re keeping well huni XXX
LikeLiked by 1 person
I am, thank you! Just taking mini break at the moment I might have a post up tonight or tomorrow. I had a lot of things I need to take care these last few days! Hope you’re well! Xo ❤
LikeLiked by 1 person
Well just take your time & go for it when you’re ready Jen 🙂 As long as you’re keeping well that’s the main thing!! All good here thanks huni XXX
LikeLiked by 1 person
That’s so pretty!! Thanks for the tutorial!
LikeLiked by 1 person
So welcome huni – thank you so much!! XXX
LikeLike
I love this!!! Really cute.
LikeLiked by 1 person
Awwh thank you huni 🙂 Glad you like it!! XXX
LikeLiked by 1 person
This is such a cute DIY! Great post karen xx
LikeLiked by 1 person
Thank you soooo much Kate – I’m so glad you like it, I have to say it was a lot of fun to create 😀 Wishing you a fab weekend & thanks for stopping by huni ❤ XXX
LikeLiked by 1 person
Omg I love this! I have always been hopeless with crafts but this looks like something even I could do. Love it Karen!
LikeLiked by 1 person
I’m telling you huni, you could do it with your eyes shut… not that you’d want to of course… slightly pointless when you can have them open *raaaaaamble alert*
Anyhoo my point actually being is that it’s so darn easy lol Thank you though for – once again – feeding my ego with your general loveliness… I’m rather chuffed you like it huni!! Have a great weekend *hugs* 😀 Xo
LikeLiked by 1 person
You too! And if I do make it I’ll tweet you a pic! Either that, or a pic of me with glue stickers all over my face 😂😂 enjoy your weekend! X
LikeLiked by 1 person
Haaaaa I’m actually having trouble deciding which one I’d rather see more 😀 lol Have a good one huni XXX
LikeLike
Such a cute project Karen! I never heard of Glue Dots. That is genius. I wonder if I could make something similar with old/broken jewelry pieces. Thanks for the inspiration!
http://laceandpearlsblog.com
LikeLiked by 1 person
Thank you so much Asa – I’m really chuffed you like it lovely 🙂 Glue Dots are amazing, and they are incredibly sticky so you’re guaranteed nothing will move – very strong indeed! Ooooh the jewellery idea would be fantastic – I would LOVE to see it if you ever give it a go 🙂 XXX
LikeLiked by 1 person
Wow this is awesome Karen! xx
LikeLiked by 1 person
Awwwh thank you so much sweetie 🙂 Hope you’re keeping well *hugs* XXX
LikeLike
Pingback: Keeping Up With Karen… | Confetti and Curves
omg,this is so pretty and colourful 😍 Thank you for sharing this amazing DIY idea,i just got my Makeup room and i will definitely make this for decoration!❤️
LikeLiked by 1 person
Awwh thank you so much Tjasa – I’m so glad you like it! Wow, congrats on your makeup room, I’m sure a button picture will be gorgeous in it 🙂 X
LikeLike
This is super cute Karen! Love it 🙂
LikeLiked by 1 person
Awwh thank you so much Lauren – what a lovely comment! Glad you like it ❤ XXX
LikeLiked by 1 person
No bother Karen! I’ll definitely need to give it a go!
LikeLiked by 1 person
🙂 XXXX
LikeLiked by 1 person
Pingback: Blogger Love | Organicbynerve
I absolutely love this!! Great work hun, beautiful!!! xoxoxo
LikeLiked by 1 person
Thank you gorgeous lady – such an easy wee craft but still really effective 😀 XXX
LikeLike
Pingback: 10 Photography Backdrop Ideas for Budding Beauty Bloggers… | Confetti and Curves
Pingback: 100 Blog Post Idea’s for Beauty Bloggers… | Confetti and Curves
Pingback: 100 Blog Post Ideas for Beauty Bloggers… — Confetti and Curves | Rach The Writer